Monday, April 30, 2012

Dinosaur Forest

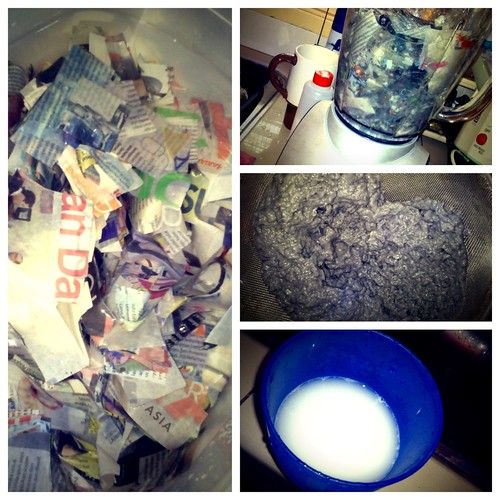
We finally completed our dinosaur forest. It took a few days for the papier mâché mountains to dry thoroughly. The papier mâché paste is relatively easy to make.

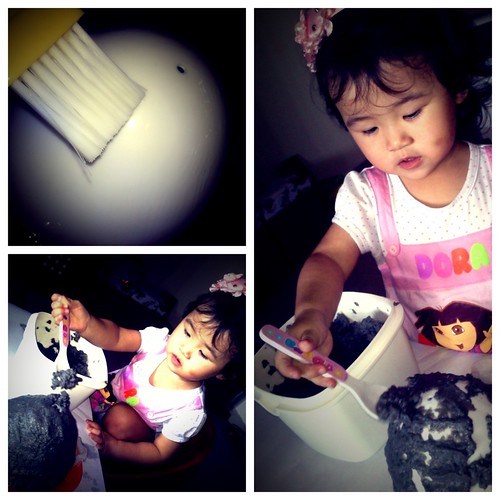
Cut newspaper into strips. Soak overnight and blend into paste the next day. Sieve and press out as much water as you can. Add in 1 part water and 1 part pva glue into the paste. Make sure it's not too runny or dry. Use the back of a bowl as the mould. Brush cooking oil all around it before putting on the papier mâché paste. Once done, leave aside in a well ventilated area until fully dried and harden. Remove bowl.

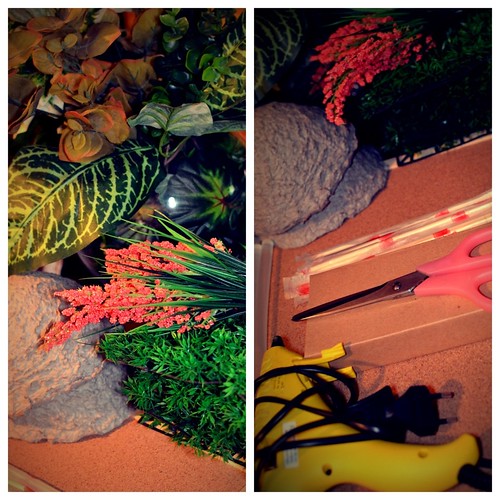
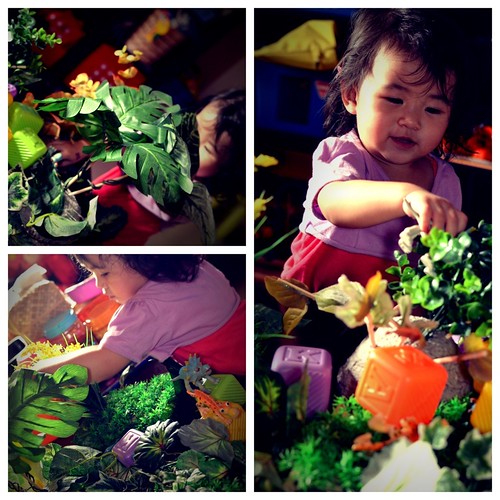
As for the forest, I used a large cork board as the base. You can use anything that is sturdy enough to hold the weight of the items that are put on top such as a plastic serving tray. Other than the board, the other essentials are; glue gun, assortment of fake leaves, fake grass panels, scissor, plier, disposable chopsticks and papier mâché mountains. Use glue gun to stick everything unto the cork board . To make trees, twirl the leaves around a chopstick and poke it into the center of the papier mâché mountain.

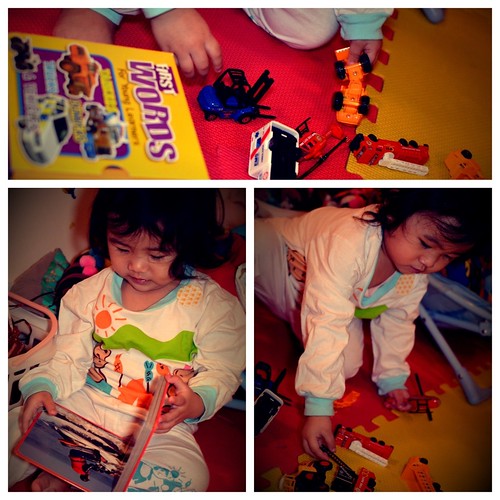
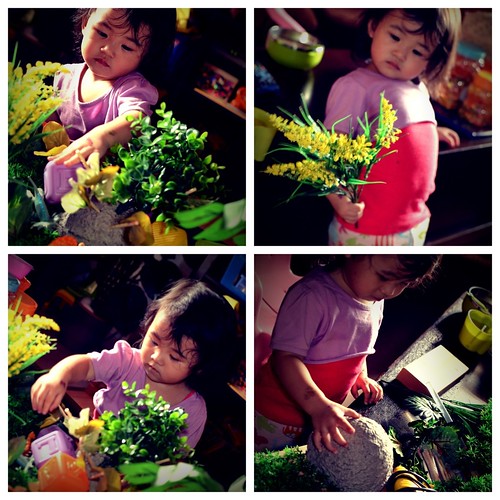
Reason why we made this; well.... as usual, I saw the prices of doll houses in the toy shop. Too frugal to buy one, and doll houses are just too main stream, with the scraps I have around the house from past projects, now we have a portable forest. Maya was so excited and helpful with this project. How I wish I could have taken pictures of he helping me out but with a hot glue gun in my hand, it was just too dangerous.

Maya loves it so much she turned it from dinosaur forest, to blocks forest, to animal forest. This is also a good way to teach your child; under, over, on, behind, in front, up and down. :)

Sunday, April 29, 2012

Medley of Activities

Firstly, grandpa bought Maya a new dress that she really loves. It's pink, looks like a ballerina's costume and has a cat in the centre. :)

While we were eating breakfast, a peddler came by our table with these gorgeous handmade bicycles and trishaw. After some bargaining, we bought all three of them.

Maya has been doing lots of activities related to books recently. Though we are actually in the midst of building something, but it will take some time before completion. So, that update will have to wait. And if you are about to scream that Maya is doodling all over her book, well, this is another one of those book that uses whiteboard marker and can be wiped off. :P

Lastly, her favorite activity, cooking. This time around we are using plastic toy vegetables that can be cut in two. This is another method to teach a child the difference between one, and half. I got mine from Toysrus. Love the fact that the amount I spent there is automatically accumulated into cash vouchers that can be redeemed later.


Thursday, April 26, 2012

Red Mitten Squirrel

Today, my good friend posted a nice pictorial guide on making squirrel soft toy out of mitten on my Facebook. I just could not resist making one for Maya. Hopefully she will like it when she sees it in the morning. Fingers crossed.

Teddy Bears Beans and Grain Art

We were out doing grocery shopping today and I was trying to find for a packet of peanuts with the least spoilt nuts. I just couldn't help noticing how beautiful all these colorful beans and grains look together and an idea struck me. These items will make a wonderful activity for Maya. So from grocery shopping, I rushed off to my favorite RM5 shop, Daiso, and got a few teddy bear containers. Maya named them, Maymie Bear, Papa Bear and Maya bear. Little girl was so excited and engrossed in scooping the grain and beans into the containers. When they were all done, or more to when we finally ran out of grain and beans, we put the covers back on the teddy bears. Lo and behold, Maya just made Maymie Bear and Papa Bear shakers with a little Maya Bear drum. I must admit there were some spilt beans and all, but nothing that could not be cleaned up with a good sweep. :)


Tuesday, April 24, 2012

Art of Paper Cutting

Maya is about to turn two in a few months. So I figured, it's time to introduce paper cutting to her. I used a purely plastic children craft scissors, a book that I bought with great bargain, and a plastic basket for her to put her cutouts. I couldn't take much picture as this project needed me to slip both my fingers and hers into the handle of the scissors. She was thrilled to be able to learn another new skill. When we woke up in the morning, she rushed to her stash of cutouts and proudly showed it to me.

And as she's getting older, she starts playing a bigger part in deciding activities for her. She will request to do certain activities that she fancies. As you can see here, she asked to do painting right after our paper cutting session.


On-The-Go Toys

I have a lot of these tie string bags leftover from one of my project. I stashed it away until I finally found a use for them. Luckily, unlike the usual small sized gift bags, these were bigger. In each bags, I put in different toys in different bags. I got quite carried away and ended up with quite a few bags. These bags were then put into a bigger box. Whenever I need to go out, I just grab a few bags, and we are all ready to go. I like to bring some of Maya's toys out to keep her entertain while the family eats and shops. Maya loves this idea so much, she actually goes through her toys systematically now. Takes, plays, puts back and opens new bag of toys.

Wheels and Books

Harry and I went scouring for cast iron miniatures of vehicles for Maya to accompany the books that we bought. We realized that, this topic has not been touched for the longest of time because Maya has shown very little interest in it. After much thought, we decided to reapproach with this manner. Glad it works!

Disassemble and Reassemble of Fake Flowers

I love using flowers in my projects. And these flowers make beautiful hair clips, brooches and many more. Best thing about it is that they are not costly at all. I like to disassemble and reassemble them for a more sturdy and seamless fit in the projects i do.The only problem is, when you remove the centre stem, all you get are flat pieces of petals. Well, my solution for it is very simple.

Separate them as per how the manufacturer has done. Hold the bottom pieces together and sew through the center. For the upper layers, sometimes you get one separation, but sometimes two or more. For these flowers, there were two.

Take the first separation and fold them into quarter. Sew to the center of the bottom layer. On the opposite side, do the same to the other set. Take the center of both sides and sew them together. Finally, fluff the petals and there you have it. A fluffy flower ready to be used.

I used the flowers I made for hair band and flower belt for my nieces. Hope they like them!

Sunday, April 22, 2012

DIY Upcycle No Sew Breast Feeding Top

I have many old tees that I no longer use. After going for breast feeding tops shopping, I have to admit, I am a little too frugal to fork out the high price for them. Instead I decided to cut up all my unwanted tees and make them into simple casual breast feeding tops. I just chop them into the required length. And with the extra bits, just cut them length wise into long strands and tie them around the front piece into knots. Well, it's really up to one's creativity. But for now, this is one of the top I have made. :)

Mall Fun

I have been showing Maya flash cards and plastic toys of vegetables and fruits since she was little. And now that she is much bigger with stronger immune system, we frequent the fresh produce section in mall. Actually, this is the only way I can convince her to sit in the trolley. She loves to hold, touch and smell the fruits and vegetables. This makes learning so much more fun for her. Not only does it make her happy, it makes grocery shopping for me so much easier now.


Saturday, April 21, 2012

Beaded Flower on Corks

I had a little extra time the other day when Maya was in deep slumber so I decided to make a beaded flower. I will continue with this project much later. For now, it will just be a single flower on corks table top decoration.

Simon-Says Finger Puppet

Just the other day, I was in Daiso, the RM 5 shop with Harry and Maya. I just couldn't stop myself from buying the appliqués. As usual, I had no idea what I was going to do with them, but I just couldn't live without them. Many days later, which is today, we made them into finger puppets. We used them to play " Simon Says ." Little girl had so much fun twirling, jumping, shaking and learning about different parts of the body with the finger puppets. Thanks to BuzzBuzzBee puppet and Teddy puppet, Maya was all worn out and ready for bed. :)

Items: Felt, thread, needle, appliqués and fabric pen.

Method: 1. Trace two fingers width of your child on the felt with the fabric pen.

2. Cut 2 pieces of felt with 5mm of allowance.

3. Sew the appliqué to one side of the felt.

4. Put both the blank back piece and appliqué piece together and sew the side with blanket stitch.

Friday, April 20, 2012

Pirate Hat, Ar! Ar!

Thanks to the influence of her father, Maya has been asking me to make pirate hat for her bear, Pinky Boo. I have been thinking day and night for the fastest and most effective way to make the hat with the things I already have. After much thoughts, I decided to use colorful foam sheets to construct the hat as it is rigid enough to maintain its' shape.

Items: EVA foam sheets, cross stitch thread, felt buttons, sewing needle, pen, ruler, scissors and a measurement tape,

Method: 1. Measure the wearer's head. I decided to use Maya's head measurement instead just in case she wants to wear it.

2. Divide by two and draw on the foam sheet. Cut two sheets.

3. On another piece of foam, draw the skull and crossbones. Cut.

4. Assemble all parts by stitching. Use the felt buttons as the eye sockets for the skull and sides of the hat.


Wednesday, April 18, 2012

Caterpillars and Butterflies

Daddy left for work today and Maya is all sad about it. Since morning, she has been asking," Papa, where?" And when she heard the front gate opening, she got all excited, dragged me to the door and shouted,"PAPA!" Sigh... I had to explain to her that Papa will not be back today. To cheer her up and to take her mind off her Papa, there was a long list of activities lined up for her. One of it was making caterpillars and butterflies from art scraps. Glad she liked it. In fact, she played peekaboo with her caterpillars. I showed her a visual dictionary on butterflies before starting the craft. Couldn't take much picture today as Maya was not very camera friendly. :P

Tuesday, April 17, 2012

Facial Expression with Plastic Bear

While shopping, I stumbled upon this glossy plastic bear that can be drawn on with a whiteboard marker. Apparently it can be drawn on, wipe off and redrawn. I thought to myself, this is one great way to teach Maya about different facial expressions! Needless to say, she fell in love with the bear at first glance. Managed to draw a few expressions and explained to her before she decided to take over the creative control to teach me where the eyes, ears, nose and mouth of the bear should be. Knowing that I should not create any negative thoughts in Maya about the bear, I let her be and joined in her game instead. :) There will definitely be a next time for me to continue this session. I always remind myself, to nurture Maya positively not forcefully. I don't want my little girl to grow up with fear and resentment towards learning.

Excursion to Aquaria KLCC

Recently, we have been doing more outdoor activities instead of indoor. After seeing how much Maya takes to her hermit crabs and fishes, Harry and I decided that it's time for us to have a trip to Aquaria KLCC again.

We made sure she had her nap and meal before going there. Just in case, we also brought along extra snacks for her to chomp on along the way. Maya had much fun this time as she is much older now. In fact, we had a hard time trying to coax her to leave. I must say, this indoor aquarium has improved a lot. The care takers are really serious about their job. Kudos to staffs of Aquaria KLCC! Keep up the excellent job!

The baby room in Aquaria was simple but very thoughtful. It has a tap that dispenses warm water and cold water so you can give your child a quick wash down after the trip in the deep sink. And just in case you need a more complete baby room, just walk over to KLCC. There, the baby room has an attached bathroom with a toddler sized toilet bowl, breast feeding area, functioning hot water dispenser, changing tables and a small play area for the kids.

Needless to say, Maya was all worn out after the trip. Well, we all were.:P We just didn't have enough energy to walk Kinokuniya book shop after that. Though she wanted to go in, but Chawamushi vs Kinokuniya on a near empty stomach...definitely Chawamushi. Guess we have to do Kinokuniya on our next trip down to KLCC then. :)